


Photography is a wonderful profession and a wonderful hobby too. In this art, there are many varieties – high-speed photography, time-lapse photography, macro photography to name a few. Macro photography implies taking pictures of very small objects. It is also referred to as microscopic photography. The microscopic world is one of great, unseen beauty. Be it the pollen grains of a flower, the hairs on the human hand or the ‘sculpture’ on many floor and wall surfaces, they all have some amazing architecture. All of this can be enjoyed by the iPhone owners; for, below is a tutorial that will help them explore this micro world in a very inexpensive way. Learn how to turn your iPhone into a microscope within minutes.
Difficulty level: This project is very small and can be done quickly. Yet it requires a certain degree of skill and care because we are handling the iPhone which is quite expensive. We grade this project as “Moderate”.
Time required: This is a very small project and can be done real quick. It will take about five minutes or ten minutes at the most to complete it. Just to be very conservative, let us estimate about 20 minutes for the project.
Resources required: Your iPhone; an SE 45x microscope; quick setting glue; cellophane or plastic wrap; cleaning cloth.
Estimated cost: The only cost involved here is procuring the SE 45x microscope and it costs a little less than $5. So, as promised by the title of this article, the cost will not exceed $5.
Instructions:
1) Unscrew the cap of the SE 45x microscope (this is nothing but a plastic bit)
2) Separate the iPhone from its case and place a piece of cellophane or the plastic wrap on the case.
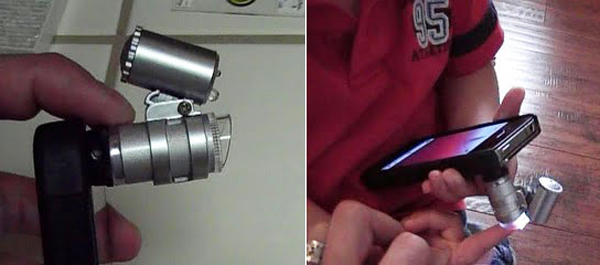
3) Snap the iPhone back on the case which is covered with the wrap and then take the base end of the SE 45x microscope and liberally apply the quick fix glue along its outer circumference.
4) Place it swiftly over the iPhone camera lens on the iPhone case; then, with a soft cloth, press the microscope gently to the iPhone case.
5) Allow the glue a few minutes to dry and make the permanent fix and separate the case from the iPhone. Discard the cellophane or plastic wrap that is covering the phone.
6) Fix back the case to the iPhone and your iPhone microscope or ‘macro’scope (as you prefer to call it) is ready for use.
Frequently Asked Questions:
Q) When I attempt to shoot photos through the iPhone, I get a black ‘circular border’ for all my photographs. Why is this happening and what should I do?
Ans: Do not worry. Remember that the SE 45x microscope was not manufactured for use on an iPhone. For a happy marriage, compromises are often necessary! You can, however, workaround this problem. Go to the settings of your iPhone camera and enable digital zoom. Once that is done, take the picture after digitally zooming to an extent that wipes out the black circular edges that appear.
Q) Is it not said that digital zooming leads to loss of information? So effectively the megapixels of my image get reduced!
Ans: That is correct. But in this case, rest assured that you are not losing anything. You are actually losing information that is junk! Either you do this, or you crop the ‘unzoomed’ photograph to get the required conmposition later in a photo editing software. ‘Cropping’ in a software is equivalent to ‘digitally zooming’ in a camera.
Q) Can I try out the same with other camera phones too?
Ans: That depends on a lot of factors. By a quirk of fate, the size of the lens and that of the iPhone camera is a perfect match. Also, the iPhone has case that protects the actual camera. If any other camera phone satisfies these needs, go ahead and experiment. (at your own risk!)
Quick Tips:
1) When putting the cellophane or plastic wrap, remember that it is only as a protection for the phone. There is no need to ensure that it does not crease or that it is neat.
2) Though the microscope claims to be ’45x’, in reality it provides only about 4 times magnification. Nevertheless, this is enough to stun us with the results.
3) The SE 45x microscope can be purchased online too through amazon.com.
Things to watch out for:
1) When you place the lens cap over the iPhone camera (on the case) ensure that it is centered. You will have only a few seconds to do this because the glue is quick setting.
2) Please note that the microscope is mounted and fixed to the case of the iPhone and not to the phone itself.
3) Be careful not to allow the glue to spill on your skin.